Showing posts with label behind-the-scenes. Show all posts

Monday, October 8, 2012

showreel breakdown and turntable

i've managed to create a breakdown video that will show what i've been doing for my robot.


i've made this with quicktime's screen capture program which was easier to use as compared to microsoft silverlight, which is a screen capture program for windows. credits to http://www.youtube.com/watch?v=8avMLHvLwRQ for giving me the music for my breakdown reel.


i also created a turntable to showcase bobbie's texturing. its pretty amazing what i've learned from good company and to be able to create something in such a short period of time. i definitely can say that i will practice more on the 3d side of things.


the better resolution version can be found with me and is to be submitted to the class.

final video to be uploaded soon!
trish x

Wednesday, October 3, 2012

post production and more bits and pieces

i was able to finish my scenes as planned but i know there is still alot to do in such a short amount of time.
i am quite proud of the turn out and i really cant wait til this is finally finished.


for most of the scenes, i had to go and re render most of them again. i know, its pain in the ass to create but its worth the time especially if you are aiming for perfection (which is what im doing). i had to re render out the scene where the robot has to be a blur in the background when i the tap is dripping, when he poses at the end and when the tap get hits by the wrench. these scenes require my attention the most and i have to redo every animation on it, plus the different passes, to get it to the level where it is now.


here are just some snippets of the scenes in after effects. these are being colour graded to suit the scene and added with particle effects for a more realistic feel.

the last bit that i really have to do is add the wiggle on the tap scene. the reason why i wanted to add the wiggle is because of it will give us the hint of strong the impact as he hits the tap. and to do this, i had to look at the tutorial for it which can be found here: http://www.videocopilot.net/tutorials/camera_shake_with_wiggler/. it was a really easy tutorial to follow and it explained to me the purpose of each tool in after effects.

now off to add sound effects!
will blog more soon!

trish x

Thursday, September 20, 2012

re rendering and all that jazz

when building my scenes, i realized that i have alot more to work on. aside from the fact that i still have to build my scenes, i also had to re render the bits and pieces that needed my attention.


one of the major things that i had to re render was the scene where the robot is travelling on top view. i had to render it out because of a strange thing that it does with the lip of the sink. it doesn't seem to catch any shadow at all and it has a "skipped" effect on the final render.


what i did to get around it in the first hand was to remove the problem area entirely. obviously it didn't work and for some strange reason, it left me with a strange white mask.

so i went back in and recreated the basin. it worked for a little bit. but, since i created it, i cant unsee it everytime i play around with it on post.

will blog about it soon

trish x

Tuesday, September 18, 2012

reflection pass and other things that almost drove me to insanity.

as suggested by the title, i had to make the reflection pass for my assignment and it did almost drove me to insanity because i wasn't too sure on how to make it. but with the help of my supah awesome friend Andrew (Hi Andrew) i was able to understand it in a simpler way possible.

the idea of the reflection pass is to render out subtle reflections on the surface where the model stands. take this one scene as an example. we see here bobbie casting a shadow on the wall but at the same time casting his reflection on the floor. the reflection here is a bit too strong though but forgive me, its my first time having a ball at this.

the reason why i need a reflection pass is because the surface of my scene is quite shiny and it needs that subtle reflection to sell it more.

now to the important bit: adding the actual reflection pass. it was pretty easy once i learned how. it was just a matter of copying all of the exsisting elements from the scene and pasting them in the new scene with the label "reflection_pass". next is to tweak with the surface shaders and override the reflection limit (right click-over ride command) and just mucking around with the mental ray settings.

when you are rendering this, just go to passes, then click on the button that says create new and select reflection passes. dont forget to tick the claptrap on the bottom of the first screen to enable this on your layer.

and yes, approximate time of waiting for this to render is about an hour tops. which was good cause the whole time i was waiting for it, i had a good snooze to just get myself psyched up again.


 and here is what it looks like for the meantime:

it definitely needs to be re rendered with the shadows though. for some reason, the shadow pass didn't render out properly. but im happy with this outcome.

overall, i've finished with all of my scenes. just alot of tweaking to do and lots of colour grading/matching and sound effects. i plan on finishing this assignment early on so i can just fix bugs and all that before submission date. hopefully, i can get alot of stuff done for my assignment over the week im away for adelaide that way theres much less hassel to do for everything else.

whoo, final 3 weeks to go. i really cant see myself finishing just yet. ;)

more soon. til next time :)

trish! x

Thursday, September 6, 2012

feedback session

it took me a few days to realize that i have not been updating this properly but instead writing down everything in my notebook. i really should get with the program and start writing down everything that happens in class in this blog instead :)

so anyway, i finally showed jarrad what i had done for the class and as it turns out i need to do more for this assignment that i thought. here are just some of the recaps i did for this project.

feedback:

sink top view: fix the shadows. it doesn't bounce properly on to the sink so the shadows don't seem natural. try to dip in the sink.
on close up shot: rotation of the robot isn't parallel to the floor.

general feedback;
-shadows need to be darker
-scenes 1 and 2: character is too crisp, add a motion blur to make it blend more with the background (do it in post). another suggestion was to add a Z depth pass which will slightly blur out the edges of the character.
-add  reflection pass so the floor would catch a glimpse of the character passing by.
-colour matching and motion blur

my personal feedback:
-arm flex need to be worked on more. (probably redo the IK handles so it will the same as the character)
-create a pipe wrench for a finishing touch.

there is honestly alot more to do in this assignment. will blog more about it  as soon as i get it working!

more sson!
trish x

Tuesday, August 28, 2012

a sneak peak :)

here's the first bit of my project. it took me about two days to get everything together, which isn't as bad as i thought and the only reason i stayed long on one scene is because i have being "nit-picky" abiout my robots movements.

originally though, i wanted to use the set driven key tool tutorial  http://lesterbanks.com/2012/01/introduction-to-set-driven-keys-in-maya/ but it wasn't working and i some parts of the scene required my robot to stop. so i scrapped that plan and just keyframed my wheels :)

in regards to wheels though, let me just say that i am glad that i had help with the wheel revolution from an actual physics student (and no, his name isn't wikipedia). the original wheel spins were a bit too slow so he calculated the actual rotations the wheels should have. here's the notes we shared in the afternoon :)


i learned that the rotation of wheels will depend on the radius and the circumference of the wheel. you have to use pi in the equation because wheels tend to be infinite and pi is an infinite number. you also have to remember to measure the distance the wheel will travel on to calculate the revolutions. :) that's a crash course in physics for you guys who are doing 3d and needs to manually find out how your wheel revolves :) hopefully, i've explained this correctly or sheldon will want my blood. LOL (thanks jackson!)

now, without further ado, here is the preview for "plumber"

i need to re-render some parts of the scene because i can see some unecessary rotations, shadows and movment that affect the whole thing. none the less, im quite happy with my progress. :)

now off to finish more stuff. stay tuned for more progress!

cheers!
trish x

Monday, August 27, 2012

creating scenes.

while creating this assignment, I found out a couple of things.

first off, i realized that most of my scenes were similar to still images and only a couple are actual moving videos (like the dripping tap and when the robot is moving along the surface). this is a good thing because it cuts down alot of work for me when it comes to motion tracking, the semi-good news however, is I have to be ridiculously patient when it comes to key framing with my characters movements. the first video below is my first attempt at doing/creating my assignment. i have to say I do have the patience for key framing and it brings out the extreme OCD side of me that many people like to point out. :)


it wasn't the best though. it was dull, lacks shadows and the perfect lighting and so on. so i went back into maya and did the whole thing again.

i was lucky to have some of the people in my class to help me out with this assignment. they gave me really good feedback and tips on how not to hate maya and make my workflow better (THANKS ANDREW AND ROBBIE :]). they taught me how to create shadows in maya and how i can recreate a few elements in my scene to make the shadows flow alot more smoother. below is the final result of what i did for the whole day.


im planning to have a go and try to finish all of the scenes since im heading to adelaide in 3 weeks time and probably wont have access to any comupter with 16gb of ram in them for a week. that way all i have to do is tweak it by bits and pieces, but for now i'll see how this all goes.

off to do more work!
cheers!

trish x

Wednesday, August 22, 2012

stabilizing scenes

just testing out motion stabilization for one of my scenes. the first being the shaky image (even though it was on a tripod). its a good piece of footage but i need it to be more stable so i can track my robot better. :)

the second one that i have was with stabilization. it is a bit better than the old one.

in all honesty, i haven't done image stabilization in such a long time, so this is kinda a second or 3rd time of trying this out. i have to say i had to find my old notes on it and experiment with the different controls in order to achieve this. im currently working on how to use boujou for my scenes. it is a good motion tracking software for 3d especially when you want your scenes to be perfect for your models.

now off to finish scenes off!
blog more soon!
trish x

Wednesday, August 15, 2012

schedule and more progress.

here is what i have to do so far for my robot project.


at the moment, im on the correct track for this assignment. its just taking me a while to upload stuff  because i actually want something to show before i write about it. 


and at last, i was able finally finish his texture. he has a new "sexy texture" that gives him an older appeal. all i have to do is to rig it and make it work :)
in his old design, bobbie didn't have any pupils in his eyes. it gave him a "creepy" look (or so have other people pointed out in class) and i decided to avoid that. Kiran from my class gave me the idea to give him pupils to give him a more puppy dog-esque look and avoids the whole creepy stature to him


his rusts look a bit more realistic as compared to the old rusts that i textured on him before. it reflected how new i am at texturing and i kinda wanted to prove to myself that im better than just that. so i took all his bits and pieces and made him a new texture that fits to an old rusty robot. i intentionally left the door bit with the old texture so that it will give him the illusion that he was spare parts on him which completes his old look.


one thing im proud of though is i textured the wheels on him. it was the first lesson i learn in texturing and i absolutely am proud of myself for doing this.

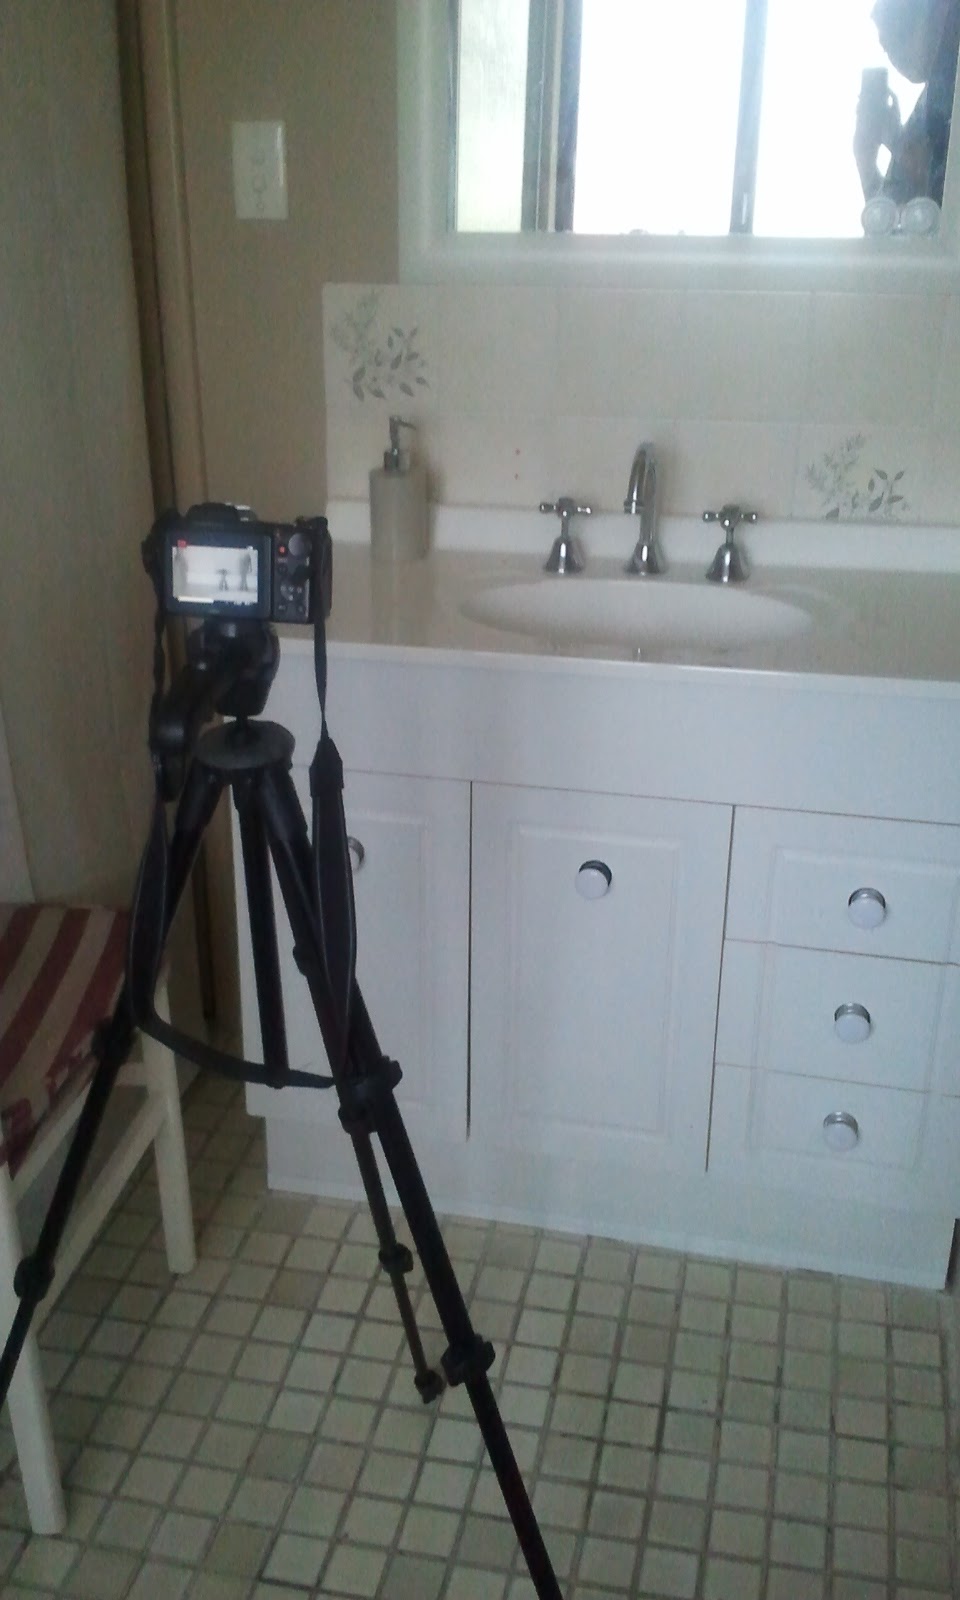
aside from texturing my robot, i also have been busy with filming my bathroom sink. it was the setting of my project so i used it to film every angle that I've drawn in my story boards.

here are some materials that i've used:


 i had to use a camera and a tripod to minimize the camera shaking. the camera that i'm using is a nikon L110 that i've borrowed from my friend Isabelle (thanks bells!). it had a good high definition video recording which i needed for this assignment and thats a good thing because i need my tracking to be at its fullest.

here are the tracking marks for my sink. i was told not to use tape cause it sticks and my mum hates that. so I used a red whiteboard marker to create the dots in the video. they come of easy and it definitely is seen against the white background.

i also had to use our baby tripod for those close up shots of the sink since this camera needs to be focused first on the specific area before you record the video. 


some of the stuff that i've used  when i was filming my scene. the camera runs completely on batteries so i had some backup ones with in my reach in case the battery died (which it did eventually!) and the white board markers to mark the area. i also had to use a 5 cent coin as a screw driver to remove the base of the big tripod from the camera, i had to switch from one stand to another so that coin really came in handy.


here is what the set up looked like. there wasn't much room for me to move in (as you can see in the mirror how close i was to the whole thing) and this was the other reason why i needed two tripods. the only light source was from the window which was great because the sunrise hits this window perfectly. that was also the time of day that i chose to create this assignment.

overall, im quite happy with the progress im getting at and i should be able to make an animatic by week 6. i wanted to thank andrew, isabelle, kiran and the guys and gals in my class for giving me feed back in regards to my sexy new robot! :)

off to more work!
blog soon!
trish x